Created by WHATWG in 2011 and standardized by IETF in the same year, the WebSocket protocol has been providing web application developers with the ability to break free from the traditional TCP Client/Server model for real-time data transfer for over 10 years.
In the initial model, the client requests a resource from the server, the server returns it, and the communication ends. It is not possible for the server to easily “push” messages to the client (such as notifications).
WebSocket provides support for bidirectional communication (known as full-duplex) in which the server can now spontaneously “push” data to the client, and where the client can subscribe to messages that interest them and react to them later. Application interactivity, directly in the browser!
In 2023, how does hosting a WebSocket server application work?
When A Stanger Calls
Let’s get back to basics: WebSocket is a network protocol in the application layer (in the famous OSI model). You don’t need to be a networking expert to use it, so everything will happen at the code level. It uses a traditional TCP connection between the client and server and the HTTP architecture.
To put it simply:
- The client will request the initial application resource (HTML + JS) from the server.
- This resource will be responsible for establishing communication with the WebSocket server to receive notifications.
- The WebSocket server will register the client as a recipient and push relevant data to them when necessary.
- The client, which was previously waiting, will receive data streams from the server and can process this data.
Note that in WebSocket, there is Web: the architecture is no different from traditional web applications. We still use HTTP/TCP, we just use a different application protocol. This means that we will need to use dedicated libraries.
The Service That Does “Pong”
There are plenty of libraries that can provide WebSocket support in almost all available web languages. For the purpose of this demonstration1), we will implement a small WebSocket server in Node.js and then in Python. You are free to implement it in PHP, Ruby, Java, Perl, etc.
Our example is very simple: once connected, our client will be able to send the ping message to the server, which will then send pong back to all connected clients one second later. This simple example demonstrates the interactivity between all connected elements (i.e. broadcasting) of our application.
With Node.js…
Currently, the most reputable library for creating a WebSocket server application in Node.js is websockets/ws. Add the ws package to your project using npm2), and create a wss.js file for your WebSocket server:
1 2 3 4 5 6 | import WebSocket, { WebSocketServer } from 'ws'; const wss = new WebSocketServer({ host: process.env.IP || '', port: process.env.PORT || 8080 }); |
We can attach the WebSocket server to the IP/PORT pair exposed in the environment variables for more flexibility, with a fallback to port 8080 for ease of development.
Our server is ready, now it needs to be equipped with its functionalities. First and foremost, it should be able to receive client connections.
1 2 3 4 | wss.on('connection', (ws) => { // log as an error any exception ws.on('error', console.error); }); |
Next, when a client sends the ping message, the server should respond with pong to all active clients.
1 2 3 4 5 6 7 8 9 10 11 12 | wss.on('connection', (ws) => { /* ... */ ws.on('message', (data) => { // only react to `ping` message if (data != 'ping') { return } wss.clients.forEach((client) => { // send to active clients only if (client.readyState != WebSocket.OPEN) { return } setTimeout(() => client.send('pong'), 1000); }); }); }); |
That’s all. To launch the WebSocket server, simply run the wss.js file with Node.js:
1 | $ node wss.js |
… or with Python!
To change things up from the usual examples, let’s create the same WebSocket server in Python using asyncio and websockets. Start by installing the websockets package using pip in your venv, and then create a wss.py file:
1 2 3 4 5 6 7 8 9 10 11 12 13 14 15 16 17 18 19 20 21 22 23 | #!/usr/bin/env python import os import asyncio import websockets async def handler(websocket): pass async def main(): async with websockets.serve( handler, os.environ.get('IP', ''), os.environ.get('PORT', 8080) ): # Run forever await asyncio.Future() if name == "__main__": asyncio.run(main()) |
Now let’s define our functionalities: registering clients, and broadcasting the message when a ping is received. Add to the handler method which contains the logic for our server:
1 2 3 4 5 6 7 8 9 10 | connected = set() async def handler(websocket): if websocket not in connected: connected.add(websocket) async for message in websocket: if message == 'ping': await asyncio.sleep(1) websockets.broadcast(connected, 'pong') |
The Web Client Side
Our client will be simple: a web page with JavaScript that connects to the WebSocket server, sends a ping on connection, and has a method to manually send a new ping.
Create an index.html file for your client:
1 2 3 4 5 6 7 8 9 10 11 12 13 14 15 16 17 18 19 20 21 22 23 24 | <!DOCTYPE html> <script> WS_SERVER = 'localhost:8080' dateFormatter = new Intl.DateTimeFormat('en-US', { hour: "numeric", minute: "numeric", second: "numeric" }) const websocket = new WebSocket(`ws://${WS_SERVER}/`) const ping = (msg) => { msg = msg || 'ping' console.log("Send message", msg) websocket.send(msg) } websocket.addEventListener('message', ({data}) => { console.log("Recv message", data, dateFormatter.format(Date.now())) }) websocket.addEventListener('open', () => ping()) </script> <p>Open the developer console and run the <code>ping()</code> function</p> |
Start your WebSocket server (Python or Node.js), and open this HTML page with the developer tools open. You should see ping/pong messages appear in the console. Try manually executing the ping() function in the developer tools.
Now open this HTML page again in another tab, with the developer tools open. Execute the ping() function in either tab. Both will receive the pong from the server.
Congratulations, you have achieved a basic level of bidirectional broadcast communication between the client and server in full-duplex via WebSocket!
Noot Noot: WebSite or WebService ?
We now need to deploy this WebSocket server and client in a production environment.
At alwaysdata, we offer several solutions for deploying tools that need to be executed for long periods of time and accessed by clients in the future: Sites and Services.
For Sites, it’s straightforward: deploying a web server (Apache, WSGI, Node, etc.) that will be requested later by a client to obtain various resources via HTTP. This is the traditional historical web.
Services, on the other hand, are designed to run long processes that can potentially be accessed other than via HTTP, within the environment of your account (such as a Git repository server over SSH with soft-serve, or a monitoring/filtering system for messaging.)
So, for a WebSocket server, should you use Sites or Services?
While one might imagine that Services are the right place — for a long-running process that can be accessed from outside — I will repeat this here: WebSocket includes Web! The WebSocket protocol is software that uses HTTP/TCP, just like any Site.
A plan that comes together
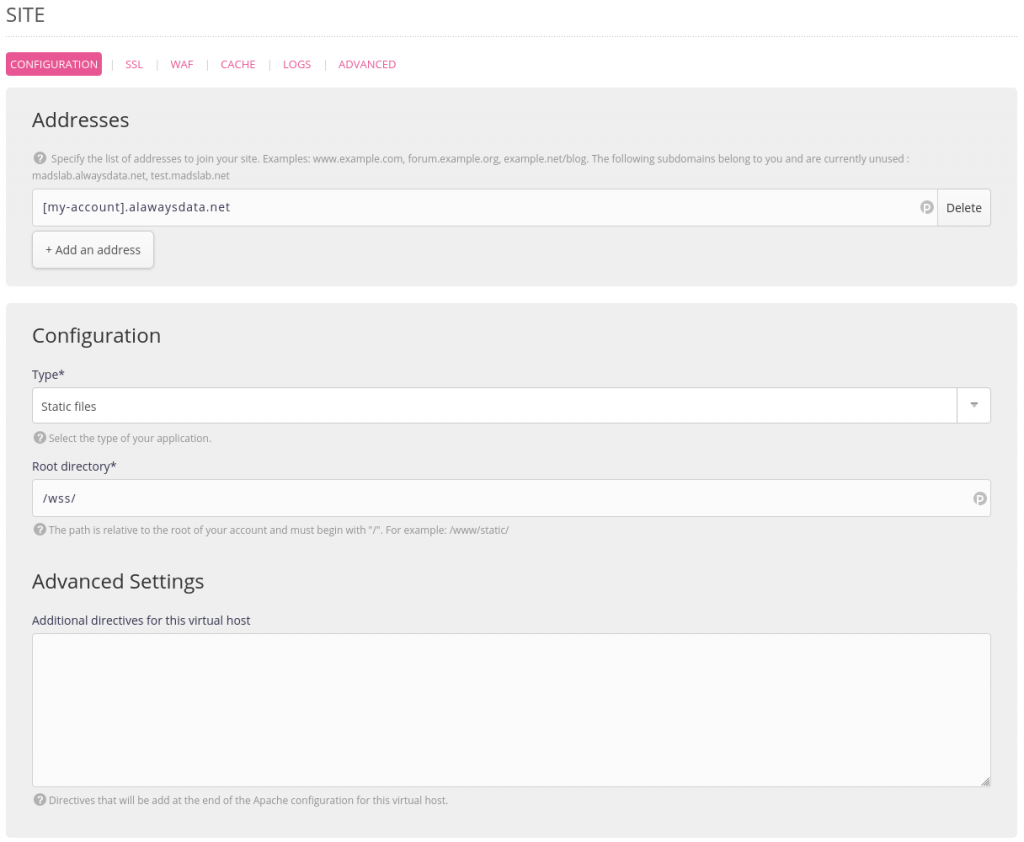
Our application consists of two parts: a client and a WebSocket server. The WebSocket server cannot serve as a resource like a traditional web server (that’s not its role), so you will need two sites:
- A Static files type site that will serve your
index.htmlclient. - A second site adapted to the language of your WebSocket server to execute it.
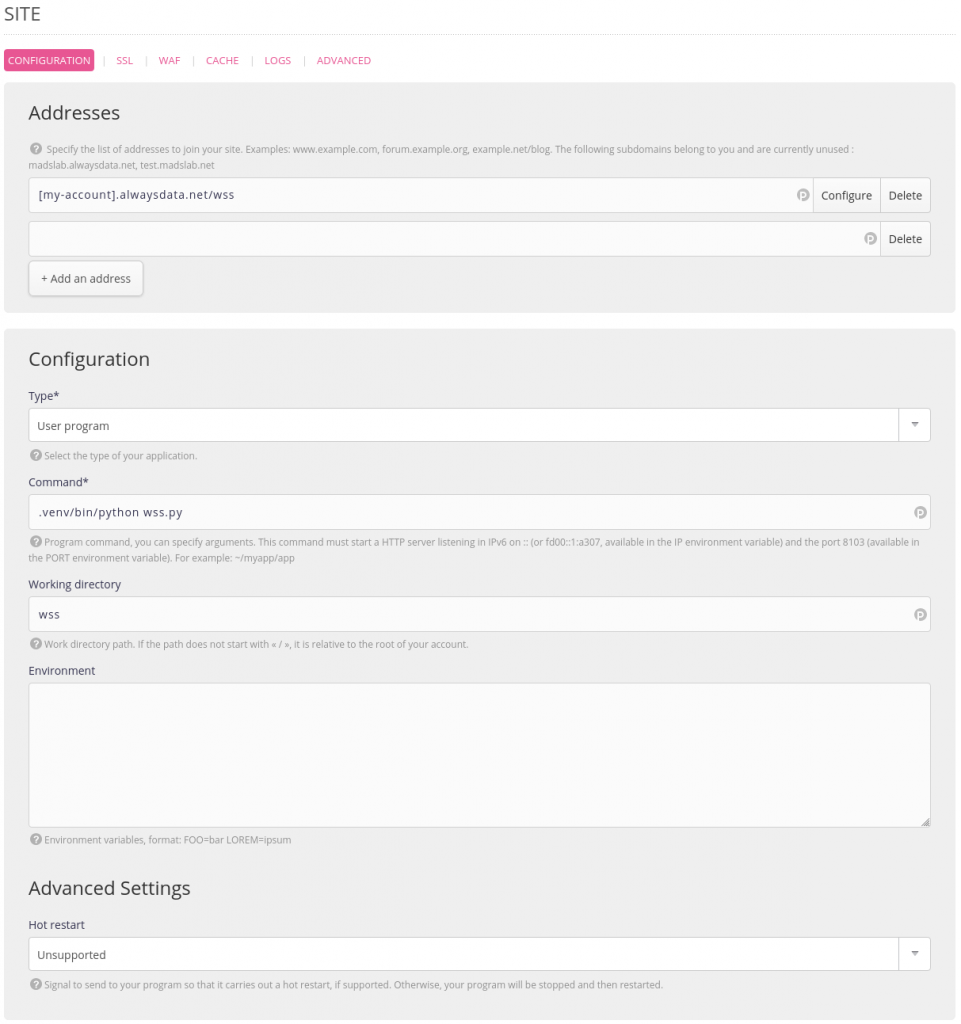
For the WebSocket server, use an address of the type: [my-account].alwaysdata.net/wss. Your WebSocket client must connect to this address. Make sure the Trim path option is enabled as the server is hosted behind a pathUrl. You may need to set the value of the idle time to 0 to ensure that it will never be stopped by the system, and to keep the connections to the clients active, even in case of prolonged inactivity.
Update the index.html file to specify the WebSocket server URL in the WS_SERVER variable. Then create a Static files site with the address [my-account].alwaysdata.net to serve this file.
Head to this address: your WebSocket communication is up and running!
This article is, of course, only an introduction to the concepts of WebSocket, but it highlights several fundamental elements:
- WebSocket enables bi-directional and simultaneous multi-client communication.
- A WebSocket server runs in parallel with the application’s Web server. The latter is responsible for distributing the application to the browser, which will then start it; but it is the former that is responsible for the transit of business data flows.
- Even though it seems to be a different protocol, WebSocket exploits the fundamentals of the Web, its underlying building blocks, and its robust protocols.
You don’t need to be a network expert to develop with WebSocket. You will use what you already know well from the Web, with its event model.
It’s up to you to find the right uses that suit your needs; to add data processing; to transit JSON or binary formats; to support authentication… Everything you already know how to do on the Web is applicable.
Happy coding!


It looks like the WebSocket is closed (1006) after 60 seconds, when the client is not sending data.
Is this because of alproxy? See https://blog.alwaysdata.com/2016/10/27/introducing-our-new-reverse-proxy-alproxy‑5/
One can prevent the disconnection it by sending pings/heartbeat every 30 seconds or so.
Is there another way to configure the timeout?
Hi M, thanks for reporting this one. A
Close Code(1006)refers to an abnormally closed connection. It may have a lot of different origins, from an unstable client connection to a bug in the WebSocket implementation itself in the engine running the WebSocket client. From our alproxy perspective, our timeout is set up to 300 seconds (5 minutes). I strongly encourage you to inspect the error event withwebsocket.onerror(evt). Feel free to open a support ticket if you experience some difficulties in debugging it.Thanks for your fast reply.
It looks like, if you don’t send a message as a client at all (e.g. commenting out ‘websocket.addEventListener(‘open’, () => ping())‘ in the code above), there is a 5 minute timeout (close code 1006).
If the client starts sending the first message, there is a 60 second timeout.
No timeout at all in the local setup.
I’ll go for the periodic pings for now, thanks.